好用的功能软件集
| 名称 | 功能 |
|---|---|
| ScreenToGif | 屏幕、摄像头和画板录像,并有内置编辑器,可导出视频、GIF |
| 名称 | 功能 |
|---|---|
| ScreenToGif | 屏幕、摄像头和画板录像,并有内置编辑器,可导出视频、GIF |
这边用docker安装了一个debian系统,干净的不得了,需要用到远程链接,所以这边需要安装ssh服务
1.备份当前的源列表文件:sudo cp /etc/apt/sources.list /etc/apt/sources.list.bak
2.使用编辑器打开/etc/apt/sources.list文件:sudo nano /etc/apt/sources.list
3.在文件中添加您所需要的更新源(以清华大学debian镜像源为例):
deb https://mirrors.tuna.tsinghua.edu.cn/debian/ buster main contrib non-free
deb https://mirrors.tuna.tsinghua.edu.cn/debian/ buster-updates main contrib non-free
deb https://mirrors.tuna.tsinghua.edu.cn/debian/ buster-backports main contrib non-free
deb https://mirrors.tuna.tsinghua.edu.cn/debian-security buster/updates main contrib non-free
4.保存并退出编辑器。
5.更新软件包列表:sudo apt-get update
6.升级所有可用的软件包:sudo apt-get upgrade
apt search openssh-server如果安装会有以下提示
root@c07e17c9af4d:~# apt search openssh-server
Sorting... Done
Full Text Search... Done
openssh-server/oldstable,now 1:8.4p1-5+deb11u2 amd64 [installed]
secure shell (SSH) server, for secure access from remote machinesapt install openssh-server -ycd /etc/ssh
cp sshd_config sshd_config.bak
vim sshd_config以下参数需要开启
Port 22
PermitRootLogin yes
PasswordAuthentication yesservice ssh start
service ssh status # 查看服务状态最后链接成功,告一段落。。
无。
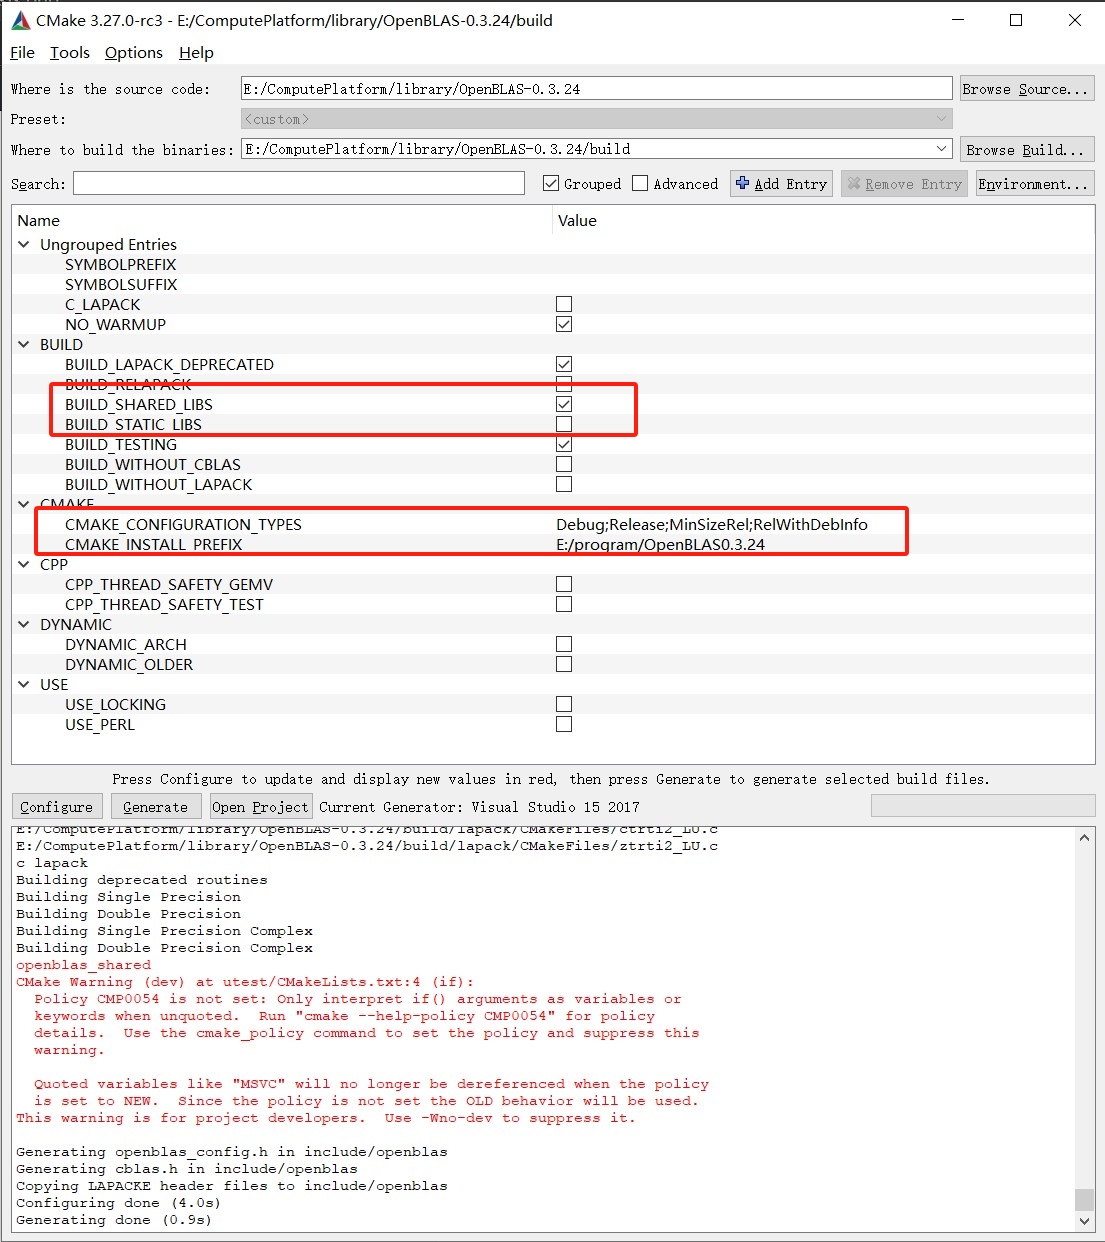
文件460行添加此代码为编译动态库debug模式的时候添加d后缀
set_target_properties( ${OpenBLAS_LIBNAME}_shared PROPERTIES DEBUG_POSTFIX d)具体配置如下图:
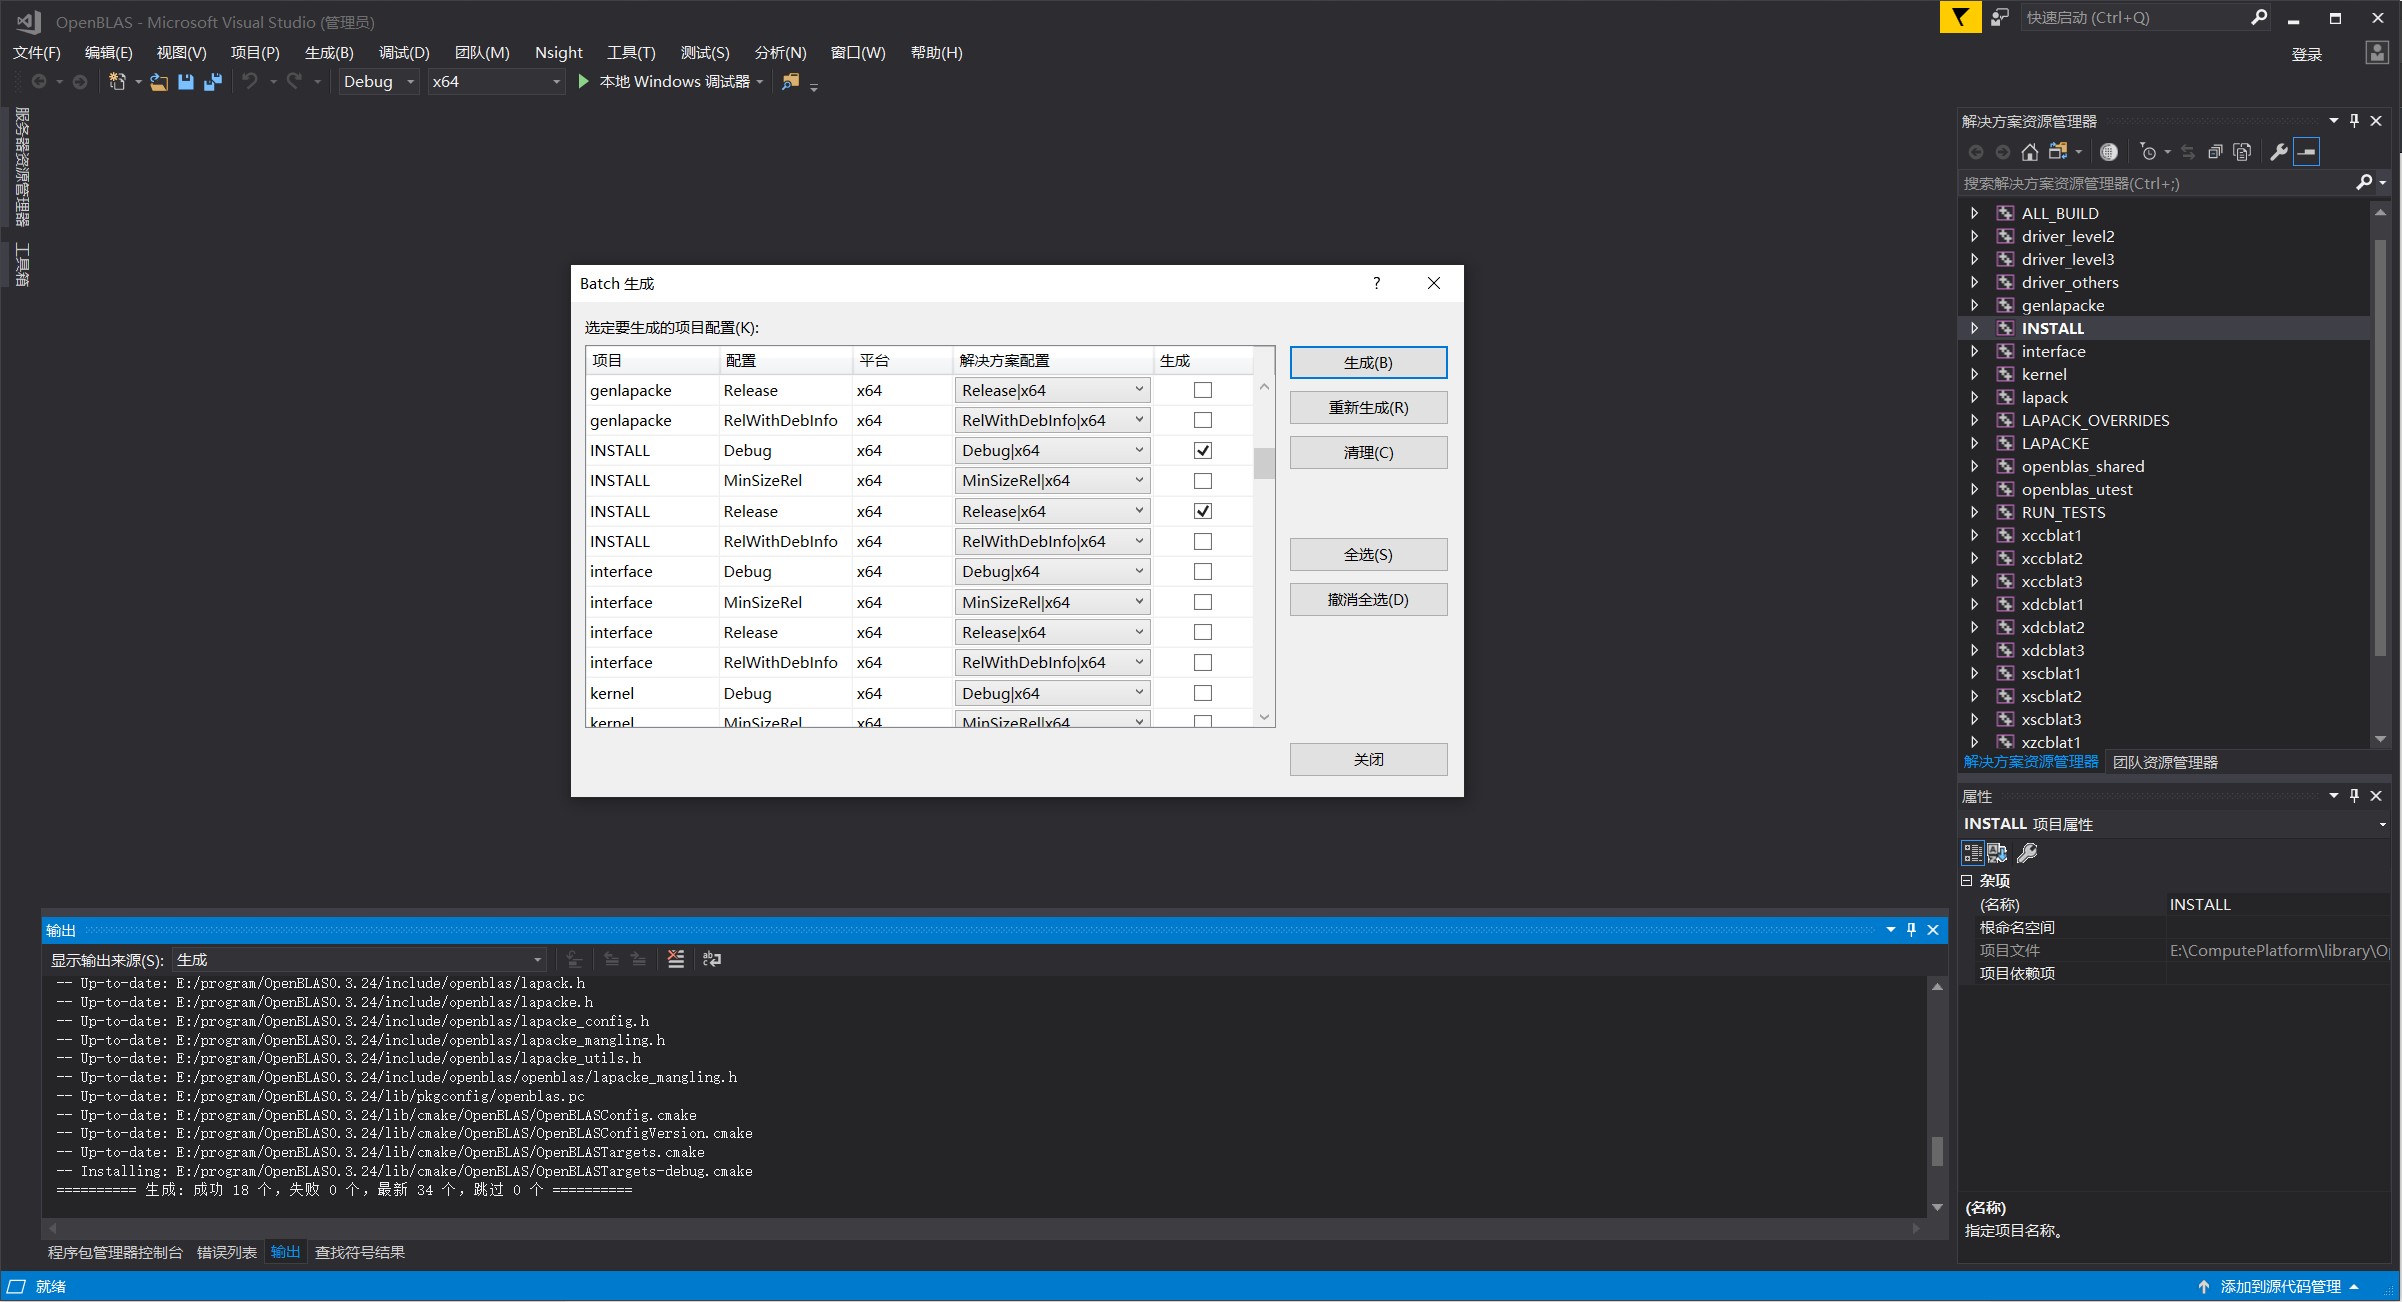
依次Configure->Generate->Open Porject(选中MinGW的话是没有最后一项的)
在生成下拉里选在批生成,勾选INSTALL的Debug和Release两个生成。
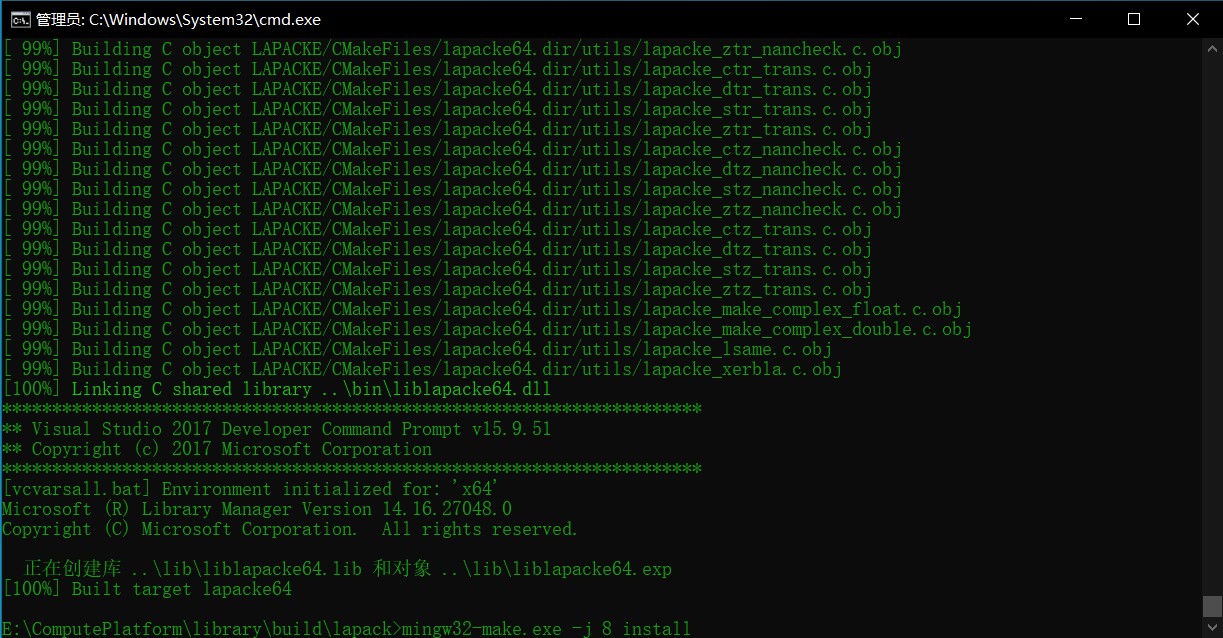
mingw32-make.exe -j8 install不能调整为动态库具体查看CMakeLists.txt 的53行
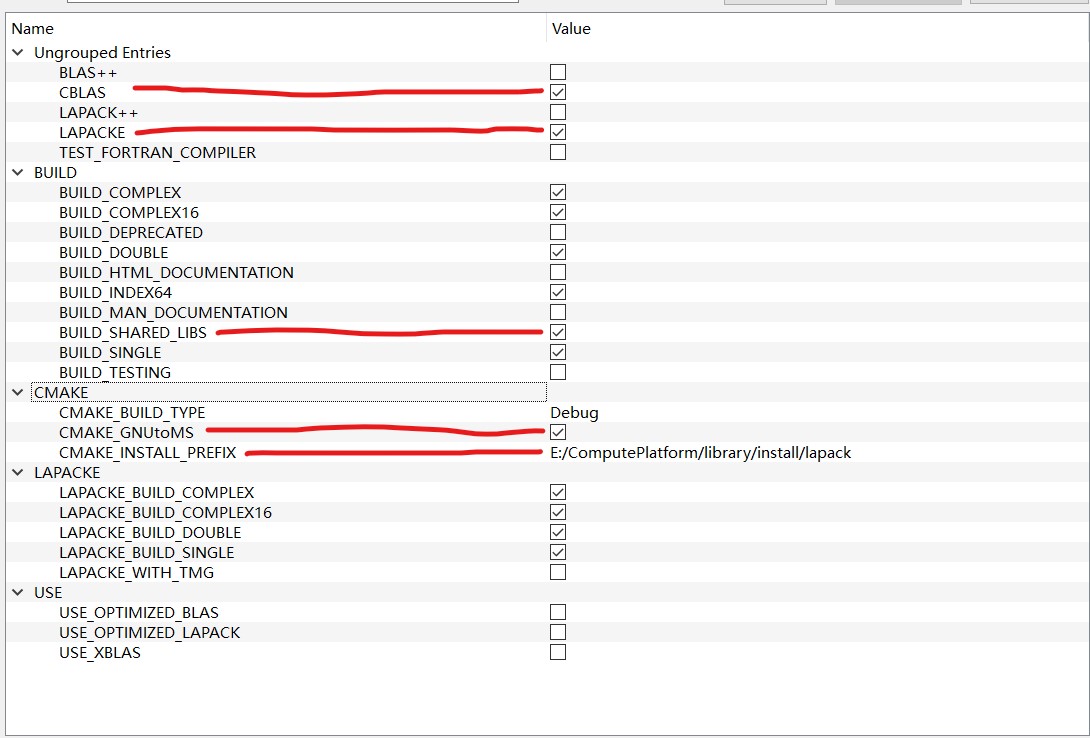
项目依赖环境太多,需要一个一个编译安装然后再做依赖,正好一个一个记录一下过程和出现的问题。
lapack官网
lapack官网下载列表
lapck-3.11.tar.gz直接下载地址(github)
lapack-3.11.tar.gz本站下载地址
MinGW Makefiles
1. cd build目录
2. mingw32-make.exe -j 8
3. mingw32-make.exe -j 8 install
[ 14%] Building Fortran object SRC/CMakeFiles/lapack64.dir/zlassq.f90.obj
[ 14%] Linking Fortran shared library ..\bin\liblapack64.dll
E:/program/mingw64/bin/../lib/gcc/x86_64-w64-mingw32/8.1.0/libgfortran.a(string_intrinsics.o):(.text$_gfortran_concat_string+0x0): multiple definition of `_gfortran_concat_string'
../lib/libblas64.dll.a(d000008.o):(.text+0x0): first defined here
E:/program/mingw64/bin/../lib/gcc/x86_64-w64-mingw32/8.1.0/libgfortran.a(string_intrinsics.o):(.text$_gfortran_string_len_trim+0x0): multiple definition of `_gfortran_string_len_trim'
../lib/libblas64.dll.a(d000038.o):(.text+0x0): first defined here
E:/program/mingw64/bin/../lib/gcc/x86_64-w64-mingw32/8.1.0/libgfortran.a(transfer.o):(.text$_gfortran_transfer_integer_write+0x0): multiple definition of `_gfortran_transfer_integer_write'
../lib/libblas64.dll.a(d000058.o):(.text+0x0): first defined here
E:/program/mingw64/bin/../lib/gcc/x86_64-w64-mingw32/8.1.0/libgfortran.a(transfer.o):(.text$_gfortran_transfer_character_write+0x0): multiple definition of `_gfortran_transfer_character_write'
../lib/libblas64.dll.a(d000053.o):(.text+0x0): first defined here
E:/program/mingw64/bin/../lib/gcc/x86_64-w64-mingw32/8.1.0/libgfortran.a(transfer.o):(.text$_gfortran_st_write+0x0): multiple definition of `_gfortran_st_write'
../lib/libblas64.dll.a(d000032.o):(.text+0x0): first defined here
E:/program/mingw64/bin/../lib/gcc/x86_64-w64-mingw32/8.1.0/libgfortran.a(transfer.o):(.text$_gfortran_st_write_done+0x0): multiple definition of `_gfortran_st_write_done'
../lib/libblas64.dll.a(d000033.o):(.text+0x0): first defined here
collect2.exe: error: ld returned 1 exit status
mingw32-make.exe[2]: *** [SRC\CMakeFiles\lapack64.dir\build.make:28718: bin/liblapack64.dll] Error 1
mingw32-make.exe[1]: *** [CMakeFiles\Makefile2:304: SRC/CMakeFiles/lapack64.dir/all] Error 2
mingw32-make.exe: *** [Makefile:155: all] Error 2在build/lapack/SRC/CMakeFiles/lapack64.dir/link.txt文件中gfortran配置参数中添加--allow-multiple-definition参数
E:\program\mingw64\bin\gfortran.exe -frecursive -fdefault-integer-8 -g -shared -o ..\bin\liblapack64.dll -Wl,--out-implib,..\lib\liblapack64.dll.a -Wl,--major-image-version,3,--minor-image-version,11 -Wl,--whole-archive CMakeFiles\lapack64.dir/objects.a -Wl,--no-whole-archive @CMakeFiles\lapack64.dir\linkLibs.rsp -Wl,--allow-multiple-definition,--output-def,lapack64.def然后重新编译就能过了。