分类 编程及辅助 下的文章

教程 | win10上编译安装lapack库


摘要

项目依赖环境太多,需要一个一个编译安装然后再做依赖,正好一个一个记录一下过程和出现的问题。

安装mingw

教程:win10上安装mingw

下载lapack库

lapack官网
lapack官网下载列表
lapck-3.11.tar.gz直接下载地址(github)
lapack-3.11.tar.gz本站下载地址

cmake配置

  1. Configure 选中 MinGW Makefiles
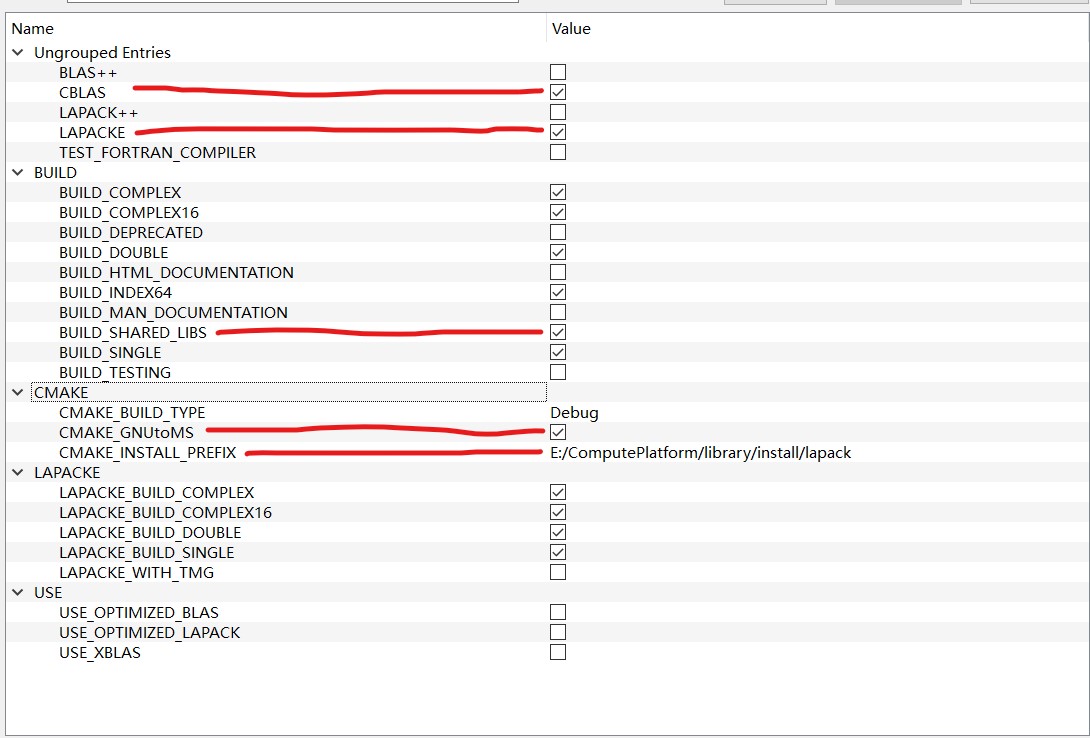
  2. 处理配置项
    屏幕截图 2023-10-28 144757.jpg
  3. Configure && Generate

编译及安装

1. cd build目录
2. mingw32-make.exe -j 8
3. mingw32-make.exe -j 8 install
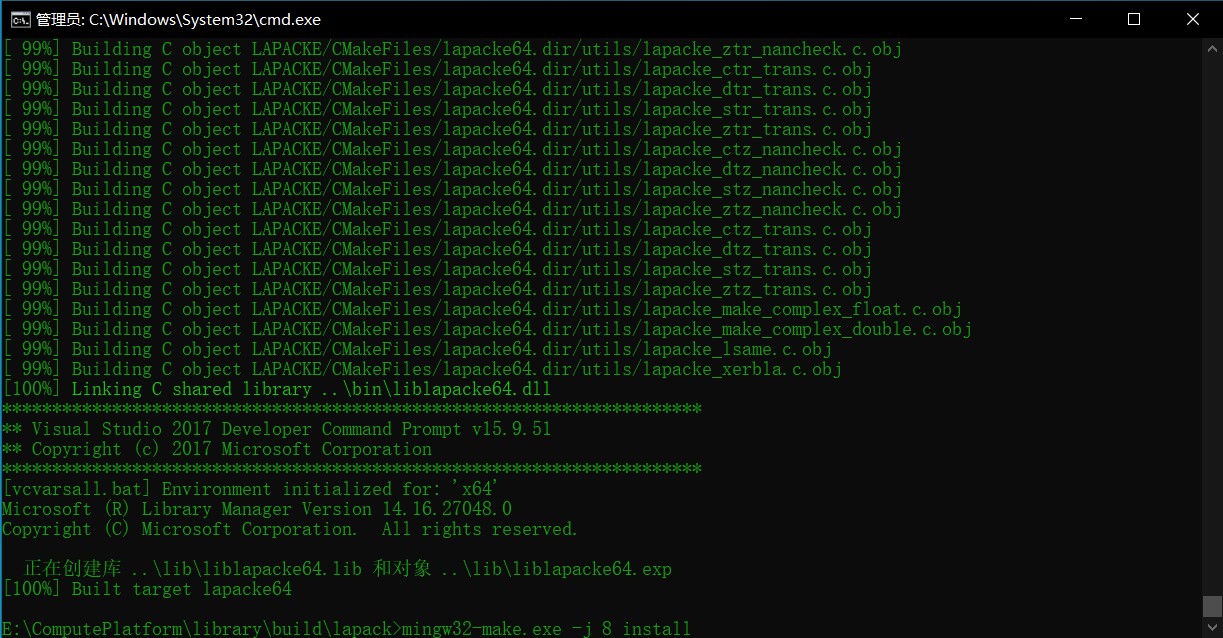
屏幕截图 2023-10-28 143234.jpg

报错处理(多重定义问题)

[ 14%] Building Fortran object SRC/CMakeFiles/lapack64.dir/zlassq.f90.obj
[ 14%] Linking Fortran shared library ..\bin\liblapack64.dll
E:/program/mingw64/bin/../lib/gcc/x86_64-w64-mingw32/8.1.0/libgfortran.a(string_intrinsics.o):(.text$_gfortran_concat_string+0x0): multiple definition of `_gfortran_concat_string'
../lib/libblas64.dll.a(d000008.o):(.text+0x0): first defined here
E:/program/mingw64/bin/../lib/gcc/x86_64-w64-mingw32/8.1.0/libgfortran.a(string_intrinsics.o):(.text$_gfortran_string_len_trim+0x0): multiple definition of `_gfortran_string_len_trim'
../lib/libblas64.dll.a(d000038.o):(.text+0x0): first defined here
E:/program/mingw64/bin/../lib/gcc/x86_64-w64-mingw32/8.1.0/libgfortran.a(transfer.o):(.text$_gfortran_transfer_integer_write+0x0): multiple definition of `_gfortran_transfer_integer_write'
../lib/libblas64.dll.a(d000058.o):(.text+0x0): first defined here
E:/program/mingw64/bin/../lib/gcc/x86_64-w64-mingw32/8.1.0/libgfortran.a(transfer.o):(.text$_gfortran_transfer_character_write+0x0): multiple definition of `_gfortran_transfer_character_write'
../lib/libblas64.dll.a(d000053.o):(.text+0x0): first defined here
E:/program/mingw64/bin/../lib/gcc/x86_64-w64-mingw32/8.1.0/libgfortran.a(transfer.o):(.text$_gfortran_st_write+0x0): multiple definition of `_gfortran_st_write'
../lib/libblas64.dll.a(d000032.o):(.text+0x0): first defined here
E:/program/mingw64/bin/../lib/gcc/x86_64-w64-mingw32/8.1.0/libgfortran.a(transfer.o):(.text$_gfortran_st_write_done+0x0): multiple definition of `_gfortran_st_write_done'
../lib/libblas64.dll.a(d000033.o):(.text+0x0): first defined here
collect2.exe: error: ld returned 1 exit status
mingw32-make.exe[2]: *** [SRC\CMakeFiles\lapack64.dir\build.make:28718: bin/liblapack64.dll] Error 1
mingw32-make.exe[1]: *** [CMakeFiles\Makefile2:304: SRC/CMakeFiles/lapack64.dir/all] Error 2
mingw32-make.exe: *** [Makefile:155: all] Error 2

解决办法

build/lapack/SRC/CMakeFiles/lapack64.dir/link.txt文件中gfortran配置参数中添加--allow-multiple-definition参数

E:\program\mingw64\bin\gfortran.exe  -frecursive -fdefault-integer-8 -g -shared -o ..\bin\liblapack64.dll -Wl,--out-implib,..\lib\liblapack64.dll.a -Wl,--major-image-version,3,--minor-image-version,11 -Wl,--whole-archive CMakeFiles\lapack64.dir/objects.a -Wl,--no-whole-archive @CMakeFiles\lapack64.dir\linkLibs.rsp -Wl,--allow-multiple-definition,--output-def,lapack64.def

然后重新编译就能过了。


教程 | win10上安装mingw


摘要

使用gcc在win上编译代码,这样省着在linux的虚拟机上编译代码检查错误了。

下载

下载页面 这个直接选择一个Files->MinGW-W64 GCC-8.1.0->x86_64-win32-sjlj
直接下载地址

解压

解压文件到E:\program\mingw64(自己预设)

配置环境变量

  1. 添加变量名MW_MINGW64_LOC变量值E:\program\mingw64(自己放置的位置)的系统变量
  2. 在Path中添加%MW_MINGW64_LOC%\bin环境变量

校验

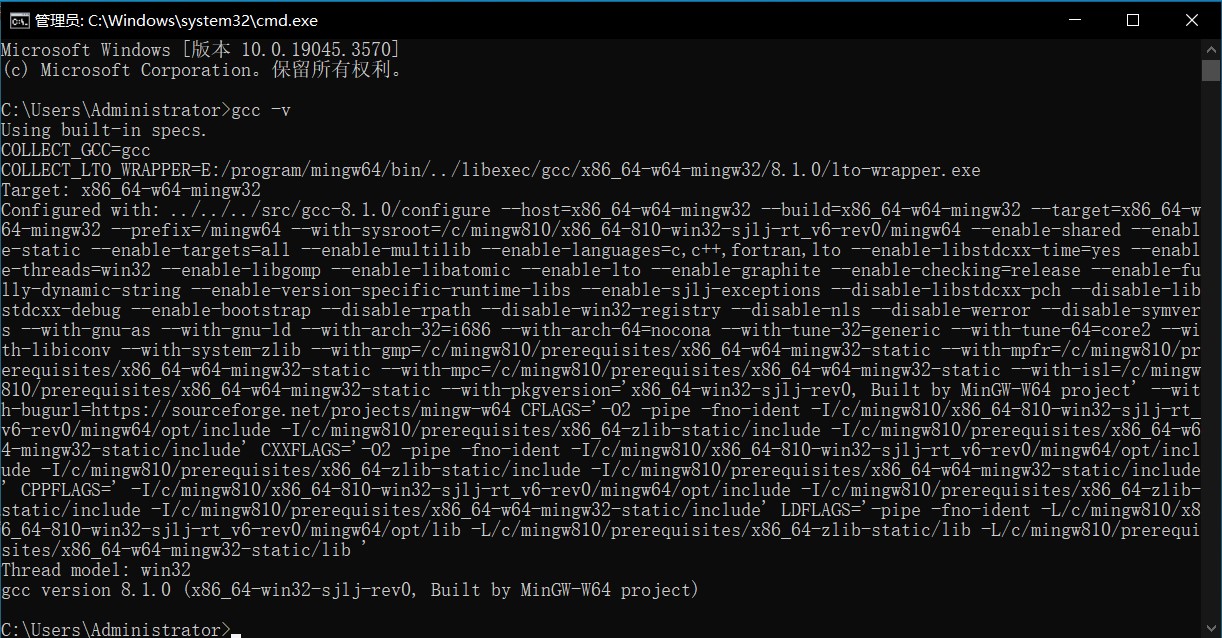
输入gcc -v后出现以下信息说明配置正确。
屏幕截图 2023-10-28 143330.jpg


Linux | Python3.10.13源码编译安装


需求

最近再适配统信的机器,但是统信的源里的软件都不是最新的,python最高版本就能支持到3.7。然而这边的三方需要的python版本是3.10的,而且需要dev版本,就需要自己重新编译了。

基础依赖环境安装

sudo apt install libffi-dev tcl-dev tk-dev libbz2-dev zlib1g-dev libsqlit3-dev libxml2-dev libssl-dev libxslt1-dev liblzma-dev libreadline-dev llvm libncurses5-dev libncursesw5-dev xz-utils libgdbm-dev libncurses-dev

编译及安装

cas_user@casuser:/data/home/cas_user/code/$ tar -zxvf Python-3.10.13.tgz  # 解压
cas_user@casuser:/data/home/cas_user/code/$ cd Python-3.10.13
cas_user@casuser:/data/home/cas_user/code/Python-3.10.13$ ./configure --prefix=/home/user/python_install_path --enable-shared CFLAGS=-fPIC  # 配置参数
cas_user@casuser:/data/home/cas_user/code/Python-3.10.13$ make -j8 && sudo make install  # 编译及安装

配置参数解析

配置项解释
--prefix=path指定安装目录
--enable-shared生成.so动态库
CFLAGS=-fPIC编译选项
--enable-optimizations启用优化

其他参数以后补充。


C++ | 一个毫秒的时间统计的代码。。


描述

所里需要在软件中添加并行下的代码运行时间,本来是想用ctime库直接统计,但是发现有些计算太微妙,不好统计。直接用毫秒来统计是一个比较好的办法

示例代码

#include <iostream>
#include <chrono>
void function1()
{
    // 第一个函数的代码
}
void function2()
{
    // 第二个函数的代码
}
int main()
{
    int total_iterations = 10000;
    // 循环的总迭代次数
    auto start_time_outer = std::chrono::high_resolution_clock::now();
    // 记录整个循环的开始时间
    for (int i = 0; i < total_iterations; i++)
    {
        auto start_time_function1 = std::chrono::high_resolution_clock::now();
        // 记录第一个函数的开始时间
        function1();
        // 调用第一个函数
        auto end_time_function1 = std::chrono::high_resolution_clock::now();
        // 记录第一个函数的结束时间
        auto start_time_function2 = std::chrono::high_resolution_clock::now();
        // 记录第二个函数的开始时间
        function2();
        // 调用第二个函数
        auto end_time_function2 = std::chrono::high_resolution_clock::now();
        // 记录第二个函数的结束时间
        auto duration_function1 = std::chrono::duration_cast<std::chrono::microseconds>(end_time_function1 - start_time_function1);
        // 计算第一个函数的执行时间
        auto duration_function2 = std::chrono::duration_cast<std::chrono::microseconds>(end_time_function2 - start_time_function2);
        // 计算第二个函数的执行时间
        std::cout << "Function 1 time in each loop iteration is: " << duration_function1.count() << " microseconds" << std::endl;
        std::cout << "Function 2 time in each loop iteration is: " << duration_function2.count() << " microseconds" << std::endl;
    }
    auto end_time_outer = std::chrono::high_resolution_clock::now();
    // 记录整个循环的结束时间
    auto duration_outer = std::chrono::duration_cast<std::chrono::microseconds>(end_time_outer - start_time_outer);
    // 计算整个循环的执行时间
    std::cout << "The overall loop time is: " << duration_outer.count() << " microseconds" << std::endl;
    return 0;
}

C++ | Lambda表达式


干啥的

C++ lambda表达式是一种匿名函数,它可以在需要函数对象的地方使用,而不需要显式地定义一个函数。

语法

[capture] (params) opt -> ret { body; }
[捕获列表](参数)mutable(可选)异常属性(可选)->返回类型{函数体}

示例

std::function<int(double)> func = [](double x)->int{ return round(x); }
std::cout << func(1.3) << endl;

捕获列表

lambda表达式的捕获列表用于指定在lambda函数体中可以访问的外部变量。捕获列表可以为空,也可以包含一个或多个捕获项,每个捕获项可以是变量、引用或者this指针。

捕获列表有以下几种形式:

  • 值捕获(value capture):通过值捕获,lambda表达式会在创建时拷贝外部变量的值,并在函数体中使用该拷贝。捕获列表使用方括号[]表示,后面跟着要捕获的变量名。例如:[x, y]表示值捕获变量x和y。
  • 引用捕获(reference capture):通过引用捕获,lambda表达式会在创建时绑定到外部变量的引用,并在函数体中使用该引用。捕获列表使用方括号[]表示,后面跟着要捕获的变量名前加上&符号。例如:[&x, &y]表示引用捕获变量x和y。
  • 隐式捕获(implicit capture):通过隐式捕获,lambda表达式会根据使用的外部变量自动推断捕获方式。捕获列表使用方括号[]表示,但不指定具体的变量名。例如:[=]表示值捕获所有外部变量,[&]表示引用捕获所有外部变量。
  • this指针捕获:通过this指针捕获,lambda表达式可以访问当前对象的成员变量。捕获列表使用方括号[]表示,后面跟着this关键字。例如:[this]表示通过值捕获当前对象的指针。

捕获列表中的变量可以在lambda函数体中使用,但不能修改(除非使用mutable关键字)。捕获列表的选择取决于外部变量的生命周期和使用方式,需要根据具体情况进行选择。

代码示例

#include <iostream>

class Example {
public:
    Example(int x) : x(x) {}

    void lambdaExample() {
        int y = 10;
        int z = 20;

        // 值捕获x,引用捕获y,隐式捕获z
        auto lambda = [&y, z, this]() mutable {
            std::cout << "x: " << x << std::endl;
            std::cout << "y: " << y << std::endl;
            std::cout << "z: " << z << std::endl;
            std::cout << "a: " << a << std::endl;

            x++; // 值捕获的变量可以修改,需要使用mutable关键字
            y++;
            // z++; // 隐式捕获的变量不能修改
            a++;
        };

        lambda();

        std::cout << "x after lambda: " << x << std::endl;
        std::cout << "y after lambda: " << y << std::endl;
        std::cout << "z after lambda: " << z << std::endl;
        std::cout << "a after lambda: " << a << std::endl;
    }

private:
    int x;
    int a = 100;
};

int main() {
    Example example(5);
    example.lambdaExample();

    return 0;
}

/**
x: 5
y: 10
z: 20
a: 100
x after lambda: 6
y after lambda: 11
z after lambda: 20
a after lambda: 101
**/

在上述示例中,lambda表达式中的捕获列表包含了部分捕获形式。值捕获了外部变量x,引用捕获了外部变量y,this指针捕获了成员变量a和变量x。lambda函数体中打印了捕获的变量,并对值捕获的变量进行了修改(需要使用mutable关键字)。在lambda函数执行后,可以看到外部变量z的值没有改变,而成员变量x,y,a的值增加了。